Custom Navigation Transitions, Part III: A Complex Push/Pop Animation
This is the third in a series on building navigation transitions for iOS apps. In the first post, we simplified the API and learned about its key protocols. In the second post, we built a simple modal animation, and learned about UIViewPropertyAnimator.
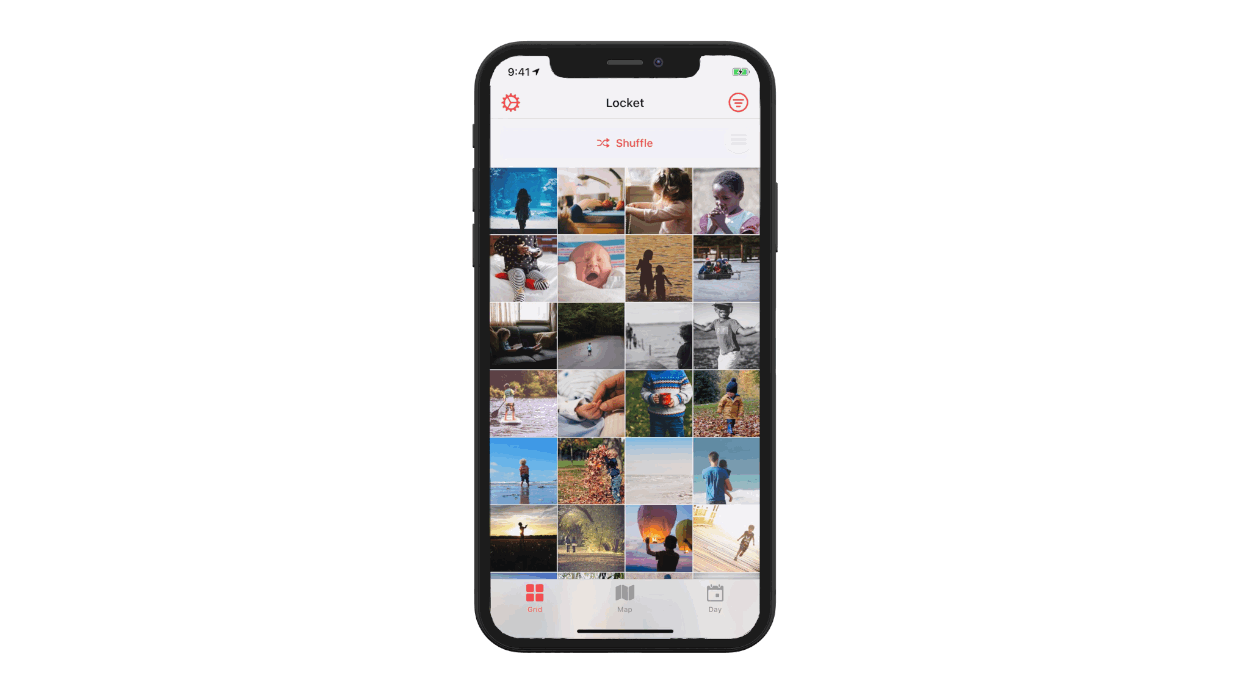
Today, we’ll be building a complex push/pop navigation transition from my app, Locket Photos. This animation mimics the transition in the native Photos app: you select an image from a grid, and it grows to fill the screen, coming to rest in the photo-detail screen. (We’ll get to the swipe-to-dismiss interactive-pop animation in the next post!) We’re going to do a detailed walkthrough of building the push transition and then (spoiler!) we’ll find that building the pop transition is extremely similar.
I recommend downloading the sample project for this series.
Here’s the push/pop transition animation we’ll be building today:

Note: This is a long post. I’m trying to walk through a non-trivial implementation of a navigation-transition animation, and that means addressing a dozen-or-so details along the way. Bryan Hansen once did this in an amazing UICollectionView tutorial, and I found it immensely helpful — so I’m trying to do something similar here: demonstrate a production-quality, non-trivial implementation.
Planning the push animation
The overall idea of this animation is that a little photo-thumbnail should grow up to fill the screen when you tap it. Simple, right? Not so fast: there are a lot of details we’ll need to handle to avoid a glitchy animation — and it’ll often take several implementation iterations until we can get things running smoothly.
Here’s what we need in our push animation:
- the selected image scales up and moves to its position on the photo-detail screen,
- the tab bar slides away.
Great! But wait! Not so fast! We don’t want to actually move the
UIImageView from the grid to the photo detail screen — that would mean lots of
code to pull out that image view, and insert it deep into the photo-detail
screen’s view hierarchy. Instead, we’ll create a temporary third UIImageView,
and hide the grid and photo-detail images during the animation.
Excellent! Oh wait, ugh, one more thing… If we just use the little image from our photo-grid and scale it up, then we’ll have this weird, scaled-up pixelated thing that flickers into the final spot. Instead, we’ll want to try and fetch the image at a larger size, if we have that cached via the Photos API.
Magnificent! Ahh wait, one more snag. The animation we want (where the tab
bar slides down offscreen) isn’t something available via UIKit — so we’re gonna
have to figure out something else there, that doesn’t mess up our
safeAreaInsets on the collection grid or the photo-detail screen.
😅 See how these details add up? This was my experience in building this animation transition — and each one of those paragraphs involved building the animation, realizing it was glitchy, updating my design plans for the animation, exploring options, and rebuilding the animation. So: if you’re doing this in your app, do not be hard on yourself if this pattern happens to you — this custom-animation dance is one of the trickier parts of UIKit, but you can do it - be patient!
Here’s our final list of what we’ll implement in the animation:
- we create a temporary
UIImageView, and set its image to be the larger-size one we’ll want in the photo-detail screen, - we’ll place this temporary image in the spot of the cell that the user has just tapped,
- we’ll hide the other images (the thumbnail that the user tapped, and the one in the photo-detail screen) so there’s only one image during the transition,
- the transition image scales up and moves to its position on the photo-detail screen,
- the tab bar slides away,
- then once the animation completes, we un-hide the photo-detail image, and remove the transition image,
- and un-hide the collection cell back on the grid screen.
Alright, that’s a healthy list! Let’s build it!
Composing the push animation
In the first post in this series, I drew some diagrams that showed different ways of composing these animations. Here are the parts of that diagram that we’ll build in this post:
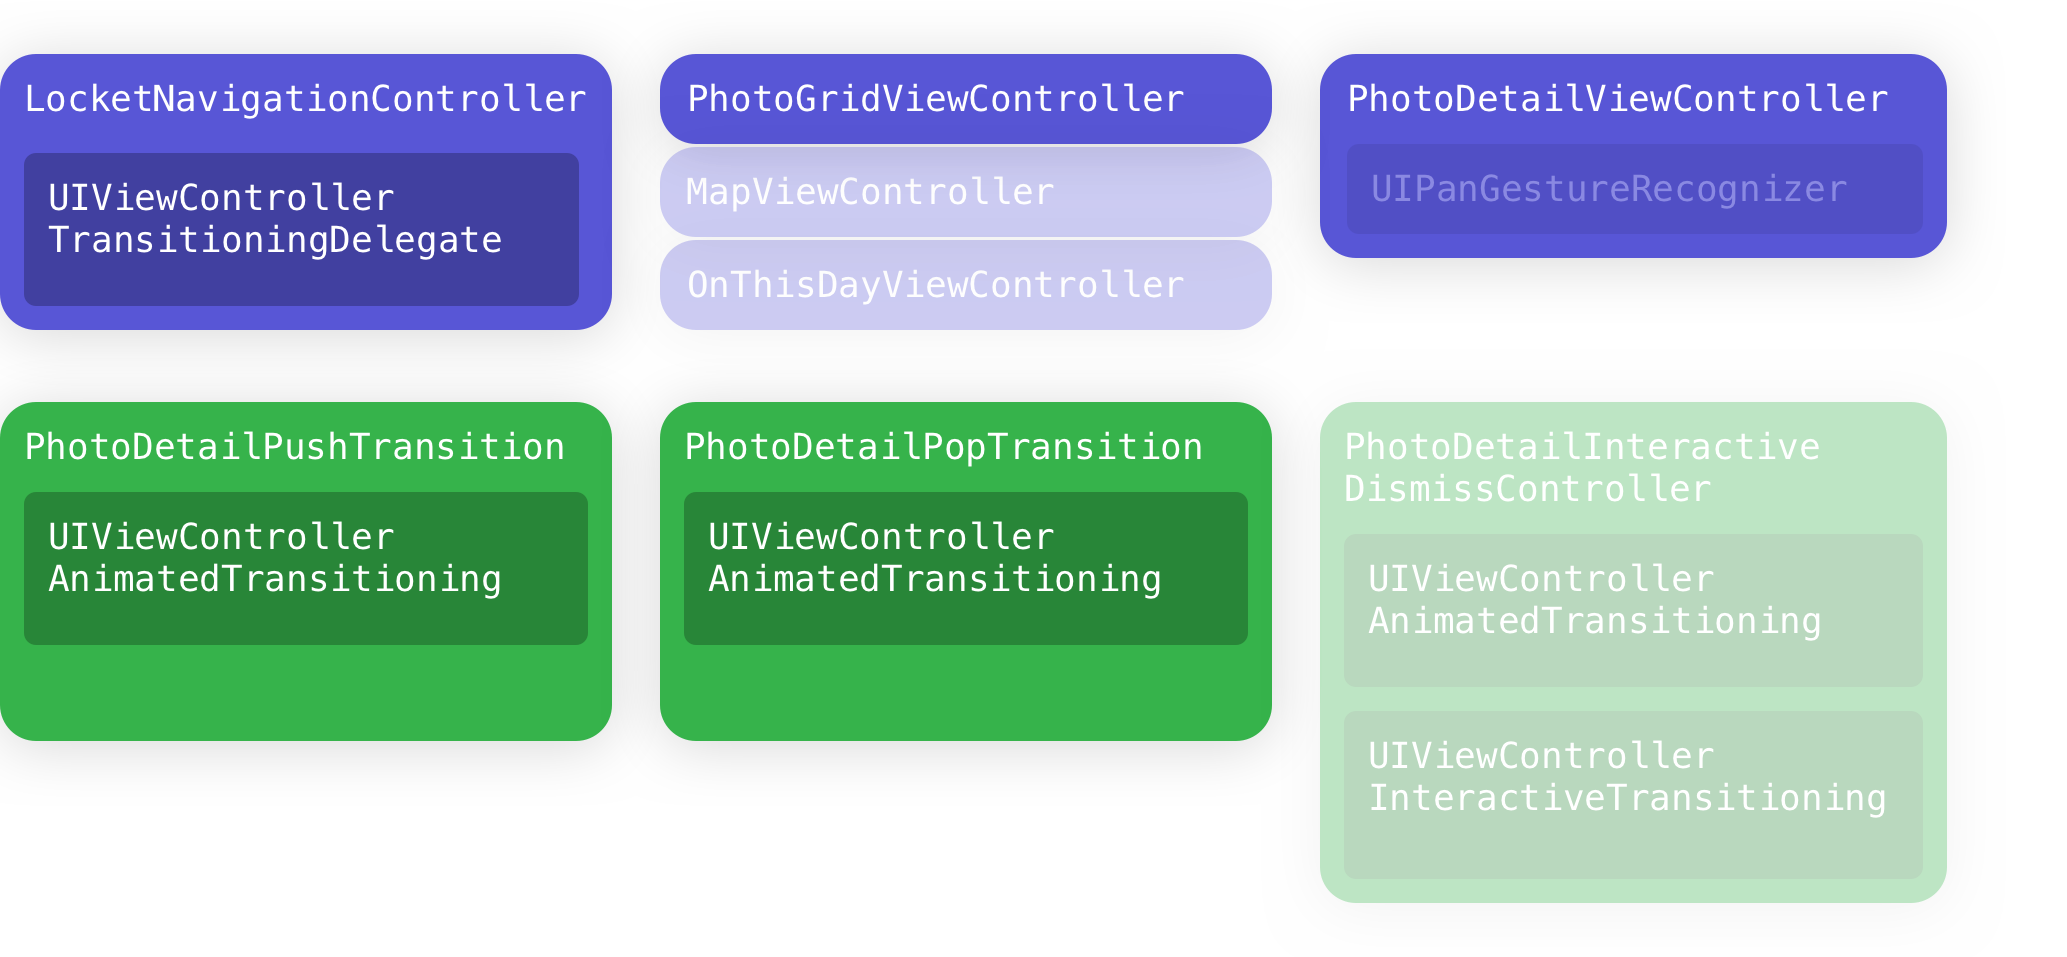
We’ll have a UINavigationController that conforms to
UIViewControllerTransitioningDelegate — this is the “vending machine” that
creates the PhotoDetailPushTransition.
We’re going to create a separate class, PhotoDetailPushTransition, that will
implement the UIViewControllerAnimatedTransitioning protocol.
We’ll also build a protocol, PhotoDetailTransitionAnimatorDelegate, (not
pictured) that will allow our PhotoDetailPushTransition to show/hide the image
views on the photo-grid and photo-detail screens.
Outlining the push animation in pseudocode
Let’s rough out the implementation, and we’ll fill in the details as we go.
First, we need to implement UIViewControllerTransitioningDelegate, where
we’ll vend an animation every time a photo-detail screen is shown. For Locket, I
chose to create LocketNavigationController, a subclass of
UINavigationController that just adds the ability to create transition animations.
public class LocketNavigationController: UINavigationController {
    public override func viewDidLoad() {
        super.viewDidLoad()
        self.delegate = self // UINavigationControllerDelegate
    }
}

extension LocketNavigationController: UINavigationControllerDelegate {
    public func navigationController(
      _ navigationController: UINavigationController,
      animationControllerFor operation: UINavigationController.Operation,
      from fromVC: UIViewController,
      to toVC: UIViewController
    ) -> UIViewControllerAnimatedTransitioning? {
    	// Whenever we push on a photo-detail screen,
    	// we’ll return an animation.
    	if
            let photoDetailVC = toVC as? PhotoDetailViewController,
            operation == .push
        {
            // TODO create and return a custom push animation.
            // return PhotoDetailPushTransition(...)
        } else {
            return nil
        }
    }
}Second, we need to build out the animation itself - let’s call it
PhotoDetailPushTransition:
/// Controls the "non-interactive push animation" used for the PhotoDetailViewController
public class PhotoDetailPushTransition: NSObject, UIViewControllerAnimatedTransitioning {
    public func transitionDuration(using transitionContext: UIViewControllerContextTransitioning?) -> TimeInterval {
        return 0.38 // NOTE: This duration felt right in-hand when using SwiftTweaks.
    }

    public func animateTransition(using transitionContext: UIViewControllerContextTransitioning) {
        // TODO build out the animation.
    }
}
Nice! We’ll have to build out the animation, but let’s keep sketching out our pseudocode, and we’ll come back to fill in the details.
Third, we need to coordinate the animation’s effects — we need to create that “transition image” that appears to move between screens, manipulate the tab bar, and do it in a way that doesn’t tightly-couple our screens’ code.
To do this, I chose to create another delegate protocol:
PhotoDetailTransitionAnimatorDelegate, which we’ll implement in our
photo-detail and photo-grid screens. It gathers snapshots of image views (and
their location onscreen), and notifies the view controllers when the transition
will start, and when it’s finished.
/// Allows view controllers to participate in the photo-detail transition animation.
public protocol PhotoDetailTransitionAnimatorDelegate: class {

    /// Called just-before the transition animation begins.
    /// Use this to prepare for the transition.
    func transitionWillStart()

    /// Called right-after the transition animation ends.
    /// Use this to clean up after the transition.
    func transitionDidEnd()

    /// The animator needs a UIImageView for the transition;
    /// eg the Photo Detail screen should provide a snapshotView of its image,
    /// and a collectionView should do the same for its image views.
    func referenceImage() -> UIImage?

    /// The location onscreen for the imageView provided in `referenceImageView(for:)`
    func imageFrame() -> CGRect?

}Fourth, we’re going to need a way to animate the tab bar up and down.
There’s not (at least, as far as I’m aware) a way to get the system to perform
this animation for free, so I’ve got LocketTabBarController, a subclass of
UITabBarController, that performs this animation.
/** A custom tab-bar-controller that:
- requires that its viewControllers be LocketNavigationControllers,
- keeps its tab bar hidden appropriately
- animates its tab bar in/out nicely
  **/
public class LocketTabBarController: UITabBarController {
    func setTabBar(
    hidden: Bool,
    animated: Bool = true,
    alongside animator: UIViewPropertyAnimator? = nil
) {
    // TODO implement tab-bar animation.
}
Note: remember last time, how I said we’ll be using
UIViewPropertyAnimator, because it makes it easy to coordinate animations between view controllers? This is a perfect example: later in this post, we’ll be coordinating the tab-bar’s show/hide animation with the rest of the animations, by passing in a property animator and attaching more animations to it!
So that’s our high-level pseudocode: from LocketNavigationController, we’ll
vend a PhotoDetailPushTransition animation to UIKit. We’ll make our photo-grid
and photo-detail screens conform to PhotoDetailTransitionAnimatorDelegate. We
also have LocketTabBarController to show and hide the tab bar appropriately.
Filling in the push animation’s details
Now that we’ve got the broad outline, let’s go back in and finish up those
TODO bits.
First, we’re going to fill in a little detail in our
LocketNavigationController. We need to provide the photo-grid and photo-detail
screen to PhotoDetailPushTransition, so we can create and animate the
transition-image properly.
public func navigationController(
	_ navigationController: UINavigationController,
	animationControllerFor operation: UINavigationController.Operation,
	from fromVC: UIViewController,
	to toVC: UIViewController
) -> UIViewControllerAnimatedTransitioning? {
    let result: UIViewControllerAnimatedTransitioning?
    if
        let photoDetailVC = toVC as? PhotoDetailViewController,
        operation == .push
    {
        result = PhotoDetailPushTransition(fromDelegate: fromVC, toPhotoDetailVC: photoDetailVC)
    } else {
        result = nil
    }
    self.currentAnimationTransition = result
    return result
}Second, we’re going to fill in our PhotoDetailPushTransition. It’s now
going to keep a reference to the photo-grid and photo-detail screens, and we’ll
be able to implement the animateTransition!
public class PhotoDetailPushTransition: NSObject, UIViewControllerAnimatedTransitioning {
	fileprivate let fromDelegate: PhotoDetailTransitionAnimatorDelegate
	fileprivate let photoDetailVC: PhotoDetailViewController

	/// The snapshotView that is animating between the two view controllers.
	fileprivate let transitionImageView: UIImageView = {
		let imageView = UIImageView()
		imageView.contentMode = .scaleAspectFill
		imageView.clipsToBounds = true
		imageView.accessibilityIgnoresInvertColors = true
		return imageView
	}()

    /// If fromDelegate isn't PhotoDetailTransitionAnimatorDelegate, returns nil.
	init?(
		fromDelegate: Any,
		toPhotoDetailVC photoDetailVC: PhotoDetailViewController
	) {
		guard let fromDelegate = fromDelegate as? PhotoDetailTransitionAnimatorDelegate else {
			return nil
		}
		self.fromDelegate = fromDelegate
		self.photoDetailVC = photoDetailVC
	}

    public func animateTransition(using transitionContext: UIViewControllerContextTransitioning) {

		// As of 2014, you're meant to use .view(forKey:) instead of .viewController(forKey:).view to get the views.
		// (It's not in the original 2013 WWDC talk, but it's in the 2014 one!)
		let toView = transitionContext.view(forKey: .to)
		let fromView = transitionContext.view(forKey: .from)

		let containerView = transitionContext.containerView
		toView?.alpha = 0

        // Next, let's add our fromView and toView to the containerView
		[fromView, toView]
			.compactMap { $0 } // (because these are Optional<UIView>)
			.forEach { containerView.addSubview($0) }

        // Set up our transition image
		let transitionImage = fromDelegate.referenceImage()!
		transitionImageView.image = transitionImage
        containerView.addSubview(self.transitionImageView)

        // If the from-view doesn't return a frame for the image, we'll figure out one ourselves.
        // In practice, this almost-never happens!
		transitionImageView.frame = fromDelegate.imageFrame()
			?? PhotoDetailPushTransition.defaultOffscreenFrameForPresentation(image: transitionImage, forView: toView!)

        // For the photo-detail view controller, it hasn't got a frame yet (because it's not onscreen),
        // so we'll calculate it ourselves - it's just centered in the view!
		let toReferenceFrame = PhotoDetailPushTransition.calculateZoomInImageFrame(image: transitionImage, forView: toView!)

        // Notify the view controllers that the transition will begin.
        // They'll hide their image views here.
		self.fromDelegate.transitionWillStart()
		self.photoDetailVC.transitionWillStart()

        // Now let's animate, using our old friend UIViewPropertyAnimator!
		let duration = self.transitionDuration(using: transitionContext)
		let spring: CGFloat = 0.95
		let animator = UIViewPropertyAnimator(duration: duration, dampingRatio: spring) {
			self.transitionImageView.frame = toReferenceFrame
			toView?.alpha = 1
		}

        // Once the animation is complete, we'll need to clean up.
		animator.addCompletion { (position) in
            // Remove the transition image
			self.transitionImageView.removeFromSuperview()
			self.transitionImageView.image = nil

            // Tell UIKit we're done with the transition
			transitionContext.completeTransition(!transitionContext.transitionWasCancelled)

            // Tell our view controllers that we're done, too.
			self.photoDetailVC.transitionDidEnd()
			self.fromDelegate.transitionDidEnd()
		}

        // ...and here's where we kick off the animation.
		animator.startAnimation()
}Third, we’re going to need to implement our
PhotoDetailTransitionAnimatorDelegate protocol in the photo-grid and
photo-detail screen.
// PhotoDetailViewController.swift
extension PhotoDetailViewController: PhotoDetailTransitionAnimatorDelegate {
	func transitionWillStart() {
		self.imageView.isHidden = true
	}

	func transitionDidEnd() {
		self.imageView.isHidden = false
	}

	func referenceImage() -> UIImage? {
		return self.imageView.image
	}

	func imageFrame() -> CGRect? {
		let rect = CGRect.makeRect(aspectRatio: imageView.image!.size, insideRect: imageView.bounds)
		return rect
	}
}
// PhotoGridViewController.swift
extension PhotoGridViewController: PhotoDetailTransitionAnimatorDelegate {
func transitionWillStart() {
// We keep track of the last-selected cell, so we can show/hide it here.
guard let lastSelected = self.lastSelectedIndexPath else { return }
self.collectionView.cellForItem(at: lastSelected)?.isHidden = true
}
func transitionDidEnd() {
guard let lastSelected = self.lastSelectedIndexPath else { return }
self.collectionView.cellForItem(at: lastSelected)?.isHidden = false
}
func referenceImage() -> UIImage? {
guard
let lastSelected = self.lastSelectedIndexPath,
let cell = self.collectionView.cellForItem(at: lastSelected) as? PhotoGridCell
else {
return nil
}
return cell.image
}
func imageFrame() -> CGRect? {
guard
let lastSelected = self.lastSelectedIndexPath,
let cell = self.collectionView.cellForItem(at: lastSelected)
else {
return nil
}
return self.collectionView.convert(cell.frame, to: self.view)
}
}Fourth, we’ve got to build out the LocketTabBarController, which animates
the tab bar up-and-down in the animation.
The implementation for the actual hiding-and-showing of the tab bar is from Simon Ljungberg, you can read his excellent blog post about it here.
We then integrate it into our animation with the following:
// back inPhotoDetailPushTransition.animateTransition

public func animateTransition(using transitionContext: UIViewControllerContextTransitioning) {

    // This feels a bit hacky, but: I've got an extension on UIViewController,
    // that returns (self.tabBarController as? LocketTabBarController).
    let fromVCTabBarController = transitionContext.viewController(forKey: .from)?.locketTabBarController

    /* <all the setting-up-the-animation-work from above... */

    // ...then right before we animate,
    fromVCTabBarController?.setTabBar(hidden: true, animated: true, alongside: animator)

    // And now, when we kick off our animation, the tab bar animation will occur, too!
    animator.startAnimation()
The pop animation
That was quite a bit, right? Good news! The hard stuff is over - now we can implement the pop animation; it’s extremely similar to the push one! 1
The only meaningful differences in the pop transition are:
- the animation goes the other direction,
- the animation has a different timing curve,
- there’s some hackery around getting the grid-view to layout before determining the destination frame for the
transitionImageView, - if the destination frame isn’t available, we slide the image off the bottom of the screen (see comments in the code for discussion).
Meet PhotoDetailPopTransition:
public class PhotoDetailPopTransition: NSObject, UIViewControllerAnimatedTransitioning {
	fileprivate let toDelegate: PhotoDetailTransitionAnimatorDelegate
	fileprivate let photoDetailVC: PhotoDetailViewController

	/// The snapshotView that is animating between the two view controllers.
	fileprivate let transitionImageView: UIImageView = {/* etc */}

	/// If toDelegate isn't PhotoDetailTransitionAnimatorDelegate, returns nil.
	init?(
		toDelegate: Any,
		fromPhotoDetailVC photoDetailVC: PhotoDetailViewController
	) {
		guard let toDelegate = toDelegate as? PhotoDetailTransitionAnimatorDelegate else {
			return nil
		}

		self.toDelegate = toDelegate
		self.photoDetailVC = photoDetailVC
	}

	public func transitionDuration(using transitionContext: UIViewControllerContextTransitioning?) -> TimeInterval {
		return 0.38
	}

	public func animateTransition(using transitionContext: UIViewControllerContextTransitioning) {
		let fromView = transitionContext.view(forKey: .from)
		let toView = transitionContext.view(forKey: .to)
		let toVCTabBar = transitionContext.viewController(forKey: .to)?.locketTabBarController
		let containerView = transitionContext.containerView
		let fromReferenceFrame = photoDetailVC.imageFrame()!

		let transitionImage = photoDetailVC.referenceImage()
		transitionImageView.image = transitionImage
		transitionImageView.frame = photoDetailVC.imageFrame()!

		[toView, fromView]
			.compactMap { $0 }
			.forEach { containerView.addSubview($0) }
		containerView.addSubview(transitionImageView)

		self.photoDetailVC.transitionWillStart()
		self.toDelegate.transitionWillStart()

		let duration = self.transitionDuration(using: transitionContext)
		let spring: CGFloat = 0.9
		let animator = UIViewPropertyAnimator(duration: duration, dampingRatio: spring) {
			fromView?.alpha = 0
		}
		animator.addCompletion { (position) in
			self.transitionImageView.removeFromSuperview()
			self.transitionImageView.image = nil
			transitionContext.completeTransition(!transitionContext.transitionWasCancelled)
			self.toDelegate.transitionDidEnd()
			self.photoDetailVC.transitionDidEnd()
		}
		toVCTabBar?.setTabBar(hidden: false, animated: true, alongside: animator)
		animator.startAnimation()

		// HACK: By delaying 0.005s, I get a layout-refresh on the toViewController,
		// which means its collectionview has updated its layout,
		// and our toDelegate?.imageFrame() is accurate, even if
		// the device has rotated. :scream_cat:
		DispatchQueue.main.asyncAfter(deadline: .now() + 0.005) {
			animator.addAnimations {
				let toReferenceFrame = self.toDelegate.imageFrame() ??
					PhotoDetailPopTransition.defaultOffscreenFrameForDismissal(
						transitionImageSize: fromReferenceFrame.size,
						screenHeight: containerView.bounds.height
				)
				self.transitionImageView.frame = toReferenceFrame
			}
		}
	}

	/// If we need a "dummy reference frame", let's throw the image off the bottom of the screen.
	/// Photos.app transitions to CGRect.zero, but I don't like that as much.
	public static func defaultOffscreenFrameForDismissal(
		transitionImageSize: CGSize,
		screenHeight: CGFloat
	) -> CGRect {
		return CGRect(
			x: 0,
			y: screenHeight,
			width: transitionImageSize.width,
			height: transitionImageSize.height
		)
	}
}
The finished product
Nice work! You’ve now gone through an example of a fairly-complex custom navigation transition. Thanks for sticking with it! 🎉🎉🎉
At this point, I’d really recommend that you download the source code and explore it yourself.
What’s next?
So far, we’ve learned about the navigation-transition API, built a simple modal transition, and now have a more-complex, non-interactive push transition. In the final post, we’ll wrap up this series by building the most-complex one of all: an interactive drag-to-dismiss transition!
-
They’re so similar, in fact, that you might even consider refactoring
PhotoDetailPushTransitionandPhotoDetailPopTransitionto be the same class — but I’ll leave that as an exercise to you! ↩